First, the usual business, duplicate our base layer, create a layer mask for our model for use later. Then we're going to create a Tentacle Layer and a Tentacle Path.
Let's start drawing our basic tentacle path with the pen tool. Start from the base and draw towards the tip. This is important, as it determines the direction the brush dynamics will work. You can change the direction of path using the pen tool, but let's get it right on the first place.
Use the Direct Selection Tool to pick up the anchor points and tweak the path until we're happy.
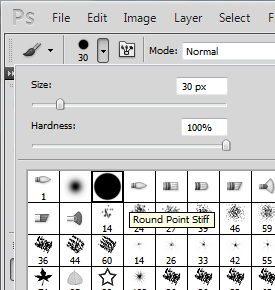
Next up, we're going to pick up the Round Stiff Brush from the brush presets. The Stiff brush (100% hardness) will give us a solid tentacle to work with.
Now we're going to tweak the brush dynamics. Open the Brush Pane and tweak the Spacing first, we're going to reduce it to 1%.
Spacing determines the number of "stamps" the brush takes when you drag it. Think of the brush as a stamp and rather than dragging it across the page, you're actually stamping the page from start to finish.
The lower the percentage, the less space you move the brush before the next stamp on the path, the smoother the outcome will be.
Next up, we're going to tweak the Size Fade. I'm going by the principle that tentacles have thicker bases and as it gets closer to the tip, the skinner the tentacle gets.
Now depending on the size of the brush and the spacing, the Fade control's value will give different outcome. The idea is, the smaller the spacing, the larger your fade control value needs to be before the brush size fades completely.
Now lets test the brush, go to the Path Pane, make sure you have the tentacle layer selected as well, and click Stroke path with brush.
Oh dear, nothing came up, our Fade Control value was too low. Let's boost it a bit.
Okay the tentacle is appearing, but it's still too thin, let's tweak it some more. I ended up using brush size 200px, 2200 fade and got this result.
Now if you want your tentacle to have a more blunt tip, you can control this by setting the Minimal Diameter. Experiment with the values and see what comes out best.
And from here, you can refer back to my last tutorial on how to give the tentacle texture, highlights and shadows to make it look more realistic.
But let's not stop here, next I'm going to show you a more complex tentacle that wraps itself around our model.
These tentacles will be a lot more complex to do as you need to consider the overlapping of the tentacle against other layers, as well as itself!
Now you can approach this by creating an actual tentacle shape, but it's so much harder to get the shape to look right, when the Brush Fade dynamics create such convincing results.
Anyway, let's get started on our next tentacle. Start by drawing the path as usual.
Play around with the path and brush dynamics until you're happy with the result. This tentacle will basically go from the background, under the leg and over to the foreground and wrap itself back around the leg again. Complex stuff!
Now create another layer called the Masking Layer. We're going to use this layer to help us mask our finished tentacle, by giving us useful information on this layer.
Keep your brush's setting as before, but add Color Dynamics to it, we're going to set the Foreground / Background Control to Fade. This basically means the colour of the brush will change from the foreground colour to the background colour as it moves.
The result is already giving us something to work with. The base (from the ceiling) of the tentacle is now overlapped by the darker mid-section. Unfortunately the last section of the tentacle is on top of the mid-section, when we want it underneath.
No problem, we'll duplicate the path (you don't have to, but I prefer to keep source material always) and delete the anchor point (using the Direct Selection Tool and not the pen tool).
Now if we do our original tentacle brush stroke, we'll have it stop before it wraps around the leg again. Let's go ahead and do that on a second Masking Layer:
Note that since I didn't delete the finishing anchor point, the brush starts again at brush size 200px on the far left. No problems, we'll just delete that bit.
From here onwards, using a combination of the two masking layers and the magic wand, and the original subject layer mask, we have all the information we need to to mask our tentacle properly.
Use the Quick Mask mode in combination of control clicking the different layers or layer masks to add and delete the masks until you've got all the different sections you need.
For this tentacle, I've broken it down into the layers - Base, Mid-Section and Tip:
By working on these seperate layers, you can get yourself a pretty creepy looking tentacle!


No comments:
Post a Comment